Fleegle Beader

Awesome Way to Add Beads to Knitting

Fleegle Beader
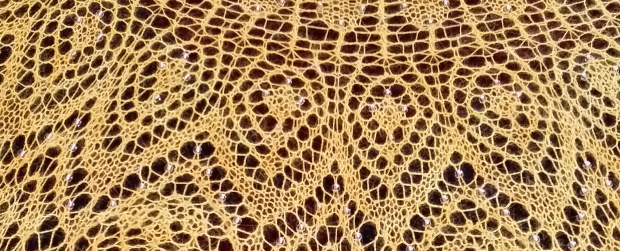
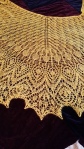
As I knit more and more, I really enjoy lace projects – especially ones with beads. But I’ve found that adding the beads can be a bit tedious. The first project I did, I tried to use a needle threader to add beads – disaster! They kept breaking. Then, I got a small steel crochet hook that would hold about 3-5 beads and that was my defacto menthod. But now, thanks to the mention of a great tool in a pattern I recently purchased, I know that the very best way to add beads to my knitting is to use a Fleegle Beader. I’m not affiliated with the tool in any way, but I absolutely love it.

What’s so awesome about the Fleegle Beader?

  1. You can use smaller-sized beads that size 6/0.  With the medium-sized beader, you can use size 8/0 beads – which often come in a great variety.
  2. You can load a TON more beads up at a time that you could ever do with a crochet hook.
  3. It’s a really well-made product that doesn’t seem to bend out of shape. And its easy to use!
  4. Depending on your project, it makes it easy to take enough beads with you to do quite a bit of knitting, without worrying about them going everywhere.
  5. It comes with a handle little plastic tube that you can put it in when loaded and that fits nicely in your knitting bag.
  6. Best of all – you can use it with a Bead Spinner!! That’s an item that lets you load beads onto your Fleegle Beader in record time.

Watch this video to see how to use the device. Its slow as molasses, but worth the watch anyway. Fast forward to 2:15 if you want to watch it in action with the Bead Spinner.

The Fleegle Beader can be purchased here: The Gossamer Web on Etsy. It comes in 3 sizes: 0.8 mm, 1.0 mm or 1.3 mm. Note: The 1.3 mm is supposed to work with size 6/0 beads and up to Fingering Weight yarn, but I had difficulty with it – many of the beads wouldn’t go over the curve and I couldn’t put the beads on even lace weight yarn. 


How to Fix a Missed Yarn Over

If you knit – especially if you knit lace – it’s really easy to miss a yarn over in the pattern. Luckily its also really easy to recover from a missed yarn over.

Scenario: you are knitting lace that the pattern calls for a yarn over between 2 other stitches (like k2tog, yo, k3, yo, ssk). You knit the pattern  and then you turn and purl the reverse side. When you turn again and get ready to knit, you realize that you missed one of the yarn overs. Well, this is how you fix it.

Knit to the spot where the yarn over should be. If there is a yarn over there, it will look like this.

The yarn over stitch is circled in red.

The yarn over stitch is circled in red.

Since you don’t have a yarn over, it will look like this instead.

The area in red is in between 2 stitches and its where we need to put the yarn over.

The area in red is in between 2 stitches and its where we need to put the yarn over.

Insert your right needle up under the bottom bar (or strand) and over the top bar like this.

Go under the bottom bar and over the top bar.

Go under the bottom bar and over the top bar.


Use your right needle to lift the bottom bar UP and over the top bar.

Lifting the bottom bar above the top bar.

Lifting the bottom bar above the top bar.

Turn your needle so you can pick up what was previously the top bar, and lift it over what was previously the bottom bar. The top bar is on top again at this point. You have now made your yarn over – just move it to the left needle and continue working the pattern.

The difference between this picture and the last one is the twist.

The difference between this picture and the last one is the twist.

Any questions, feel free to leave them in the comments.

Knitting Lace: Lessons Learned

Newly finished lace shawl.

Newly finished lace shawl.

I love the items I make with lace yarn – they are incredibly versatile. I went to a Science Fiction convention last year in the hottest part of summer and my lace knitting was a my savior. When I was inside and got cold from the air conditioner, I could put the item around my shoulders and be the perfect temperature. And when I went outside, I could either wrap it around my waist and use the shawl as a belt, or stuff it in my bag and have it take up very little room. Plus, I felt so pretty in my lace!

I also absolutely LOVE to knit and crochet lace – especially in the summer when its too warm to have something heavy on my lap. I love working with the super fine yarn and I love to see how different the project looks after you block it from how it looked on the needles. Recently I finished a shawl I’ve been looking forward to working on for months: the Sheherazade Beaded Lace Shawl (details on my Ravelry page). I knit several lace shawls last year as well for my wedding, so I feel like I’ve gotten pretty good at lace – enough so that I don’t even use lifelines any more.

A scrumptious alpaca lace yarn. I kept petting it until I finally got to knit with it.

A scrumptious alpaca lace yarn. I kept petting it until I finally got to knit with it.

Things I Learned to Make Lace Knitting Easier

  • It is really helpful to have pictures of the finished the project. Sometimes I’m not sure if I missed a stitch or not but the project might just seem wrong. I can refer to the picture and see how the project is supposed to look and that often helps me sort it out. I especially like detailed pictures, so look for those when you pick out a project.
  • The most common mistake I make is to leave out a yarn over. It’s very easy to do. Luckily, it’s also very easy to fix. So if your stitches don’t seem to be coming out right, check to see if you are missing a yarn over.
  • I prefer to have very little color variation in my yarn when I work with lace. It makes it so much easier to see the pattern emerge.
  • If you can’t decide which color beads to use, just pick one. I had a piece I was working on and I swatched it with 3 colors of beads. I couldn’t decide which one I liked best but what I didn’t realize is that meant I liked them all. I took a poll of my knitting group and they all voted for different ones. So, I decided that meant there was no wrong answer.
  • Unless you are using lifelines, it is not a good idea to try to unravel lace by taking out the needles and pulling on the yarn. Because of all the yarn overs and decrease stitches, you will likely NOT be able to recover from this. Instead, tink back (or unknit) to the point where you made the mistake. I will do this even if I have to do multiple rows. However, if I’m near the beginning I’ll just pull the whole thing out and start over.

Do you like to knit lace? Crochet it? Let me know in the comments.

Knitting a Living Room Rug

5

I just recently moved into a new house and I’m in the process of unpacking and decorating. I actually picked the colors of my living room based on a Knitpicks.com Swish kit which was recently on sale – plum (blackberry), silver and grey were the colors of the kit in a superwash wool, bulky weight. I figured I’d make an afghan for myself, since the GroovyGhan (see the header of the blog) is going downstairs to the living room down there. I ordered plum paint for an accent wall (it is currently brown) and I put tons of plum and silver decorations in my Amazon wish list, hoping I might get some of them for Christmas.

Then I started shopping for rugs. I saw rugs near the size I want – 7 ft by 5 ft – on Pottery Barn’s web site for almost $1000! Sure they are wool and I’m sure they are great quality, but I started thinking – couldn’t I knit a rug a lot less expensively? AND have it match my walls and afghan perfectly? Plus, since the rug is going on a carpeted floor, I won’t have to worry about it sliding around as it would on hard wood.

So I did some research online trying to determine how much yarn I would need to make a rug that was the size I want. I found a site which showed the average amount of yarn needed per square inch of each yarn weight. I have no idea how accurate that is, but I needed a place to start. Next I created a spreadsheet to help me do the math and I plugged in my desired size – 7 ft by 5 ft – and converted it to the number of yards of yarn I needed. It should be 2100 yards if my math is correct. I found that I could get a 100% wool yarn (not superwash) from Knit Picks (Wool of the Andes) and the whole price of the project would be less than $100. So, I ordered the yarn and I’m going to give it a try.

I plan to knit the rug in strips of stockinette and then graft the strips together. This is mostly because I don’t have any 5 foot long knitting needles. I’ll knit it to 6 ft x 4 ft and graft it together, then I’ll knit or crochet a border around the entire thing which will be first light grey and then purple. Hopefully it will look great and wear well. I guess if it doesn’t I can always use it as another afghan!

One concern which my Mom broached – what if someone walks on it in high heels? That’s not something that happens often in my house but I’m hoping if it does it won’t be a problem. I guess it will depend on the heels! I had thought that if I felt the yarn it won’t be an issue. But then the rug will have to be even bigger to allow for shrinkage so… no.

I have a few other projects to finish up before I get started on the rug, but I just received the yarn today (16 skeins of blackberry and 3 of silver). I’ll let you all know how it goes. I may even post a pattern at some point in the future.

What do you think? Will it work?

Angora Fingerless Mitts

2

100 yard Angora Fingerless MittsA while ago, I went to a fiber show and picked up 100 yards of hand spun fingering weight angora. I asked the seller what I could reasonably make with such a small quantity and she said fingerless mitts. But when I went online, all the patterns called for more than 100 yards. Plus, I really wanted to use up as much of the yarn as possible. So, I wrote my own pattern and shared it with a friend.

Then, in September, I went to another fiber show and got some more angora. I had several people ask me what I planned to make with it and express an interest in the pattern when I told them. So I have written the pattern and its on Ravelry. The pattern is very simple because Angora really blooms after you wear it a few times (gets fuzzier), so any really complex pattern would be lost.

What do you think of my fingerless mitts?

Gauge Swatch: When Can You Skip It?

I have noticed a few things about gauge swatches which I find interesting:

  1. It seems like the newer and more inexperienced a knitter/crocheter is, the less they want to make gauge swatches.
  2. Pretty much every “how to” resource you read really stresses the importance of gauge swatches.

And yet, I still hate to do them myself. You should swatch every time. And yet, there are circumstances under which I will just just skip the swatch. Every time I do I take a risk that the finished product won’t be the correct size and that I’ll run out of yarn. However, sometimes choosing not to make a swatch is a calculated risk I’m willing to take. If all three of these criteria are met, I will sometimes skip a gauge swatch:

  1. If I making something that doesn’t have a “fit”: blankets, shawls, curtains, etc.
  2. If the pattern is by an established publisher
  3. If the yarn is made of fibers I’ve worked with before

Items that don’t have to fit

If an item has a size, you need to do a gauge swatch every time. There really isn’t any getting around this. If you don’t, you will probably end up doing a lot more work in the long run than you would have just doing the darn swatch.  So, if you are going to put it on someone’s body, swatch.

Established Publishers

I have come to find that if I am making something with a pattern by an established publisher – something from a book or a magazine or a really well established designer on Ravelry – I can count on the gauge being pretty reasonable most of the time. There have been exceptions – like a sweater I made once that I had great difficulty even getting the gauge no matter how small of needles I used – but usually established designers seem to have a pretty consistent gauge. On the other hand, the person who has a free pattern up on Ravelry or a web site whom you’ve never heard of before is more likely to have a messed up gauge.

Yarn Fibers

When the fibers are those I’ve worked with before I generally know how they will behave. If its something new or rare to me, I gauge to take out the uncertainty.

When do you skip the gauge swatch? Do you hate to swatch?

TARDIS Scarf Pattern Now Available!

3
TARDIS scarf made with fingering (sock) weight yarn.

TARDIS scarf made with fingering (sock) weight yarn.

I was inspired to design this, my first for-sale pattern, when I found a really nice, free shawl pattern with TARDIS motifs. I was going to make that pattern because I had the perfect color yarn, but I didn’t have quite enough. I thought about making it 2 colors but ultimately decided I really wanted only one color. So I set about modifying that shawl pattern to make it just a scarf.

That’s when I decided that I really wanted to make the TARDIS very differently than what the shawl had. And the next thing you know I was searching for TARDIS pictures online and starting to piece together my own version. Because I hate color work and weaving in ends, I decided to use beads for the white touches. For a while I couldn’t get it exactly the way I wanted it – I think I unraveled that first TARDIS about 16 times. But eventually I realized this was intended to be my representation of the TARDIS, not an exact picture and that took a lot of the pressure off.

I’m really happy with the end result and looking forward to wearing it. The yarn is a wool/silk blend so it is super soft. It will be a pleasure to have this around my neck.

To purchase the pattern for yourself, go here.

How to Make the Perfect Sock Knitting Kit

A stitch counter & a variety of markers. Note how some of the markers open and some do not.

A stitch counter & a variety of markers. Note how some of the markers open and some do not.

As I mentioned in my last post, I really enjoy knitting socks. As I know you will, too, I thought I’d share with you the contents of my sock knitting kit. This is something that has evolved over the last year of knitting socks and now it has everything I need to knit socks most of the time.

First off, start with a bag which is made of cloth. I know, you’d think you want a knit or crocheted bag but the needles for socks are so small they will constantly stick out of anything that has holes. So I have a cloth drawstring bag (I got mine from Knit Picks) to hold all my sock materials. It’s big enough to hold 2 balls of sock yarn and 2 pairs of socks, but that’s only about 6″ x 10″ or so.

Obviously your kit then stats with the yarn, pattern and needles for your socks. After you have that, add:

  1. A tape measure
  2. A few colors of sock weight yarn in small amounts. This comes in handy whenever your pattern calls for scrap yarn (like for an afterthought heel).
  3. A small crochet hook. You can use this to help you pick up tiny dropped stitches. I like a C size, personally.
  4. At least one stitch marker. Almost every pair of socks wants you to mark the beginning of the row with a stitch marker. If you have a few (5 or so) you’ll be prepared for most patterns.
  5. A pencil to mark your pattern as needed.
  6. A pair of scissors which won’t stab you. You can do a pair of folding scissors, a pair with a sheath or a pair with rounded tips. Mine are on a cord so I can wear them around my neck.
  7. A row counter of some kind. I have a small one attached to the cord for my folding scissors. You can also use your phone to count stiches, in which case you can skip this.
  8. If you are knitting on DPNs, you may want a holder so that your stitches don’t come off the needles.

That’s it! If you build a kit with all those things, you’ll be prepared for almost any sock making contingency.

Anything I missed? Let me know in the comments what you keep in your sock making kit.

6 Reasons You Should Try Knitting Socks

6

Toe-Up Socks with Self-Striping Yarn

Knitting socks will make you a better knitter!

Ever since I knit my first pair of socks, I’ve almost constantly had a pair of socks on my needles. I resisted sock knitting for a really long time, partly because they look hard but mostly because I figured that was a lot of work for something that would only be on my feet and not seen very much. But now that I’ve knit a few pairs, I love to knit socks!

Reasons Socks are Great to Knit

  1. Knitting socks will make you a better knitter! Knitting socks is a great way to learn a variety of intermediate & advanced knitting techniques fairly easily. Sure you could knit a sweater, but that’s a big investment in time AND yarn if  it doesn’t turn out well. With socks, you can learn to do short rows, increases, decreases, cables, ribbing, lace knitting… pretty much any technique. And its a lot less investment than a sweater.
  2. They are very portable. I can stick a pair of socks in my purse and take them with me anywhere. Most people I knit with have a small project as their “purse knitting” and socks make a great choice.
  3. They don’t take very long. I can usually finish a pair of socks in a few weeks if I work on them as my main project.
  4. Hand made socks are soooo comfortable.
  5. You can make them exactly like you want them – plain, fancy, lacy, striped, fuzzy, multicolored… whatever makes your perfect sock you can knit for yourself.
  6. They aren’t as hard as they look. And there are TONS of resources online to help you get started.

Please share your sock knitting experiences in the comments. Do you have a favorite yarn? Favorite sock designer? I’d love to hear about it.

10 Extremely Useful Knitting Resources

1

Below are 10 of the most useful knitting resources I’ve found lately. I thought you all might get some benefit from there:

  1. How to Weave in Ends
  2. How to Hide Your Ends AS YOU KNIT
  3. Video: How to Block a Sweater
  4. Counting rows when knitting cables
  5. Video: How to Knit 2 Socks at a Time On Circular Needles
  6. Double knitting tutorial
  7. How to Mend Holes in Woolens
  8. How to Darn Socks
  9. How to Bind Off When Your Out of Yarn
  10. How to Add an Afterthought Thumb to Mitts

What are your favorite resources online?